Blueberry cheese Mille crepe cake

Now that I have got myself an IPad, it is a lot easier for me to blog using my iPad/iPhone photos!

I have another exam in November 2016 so let’s see how long I last in blogging till then!

imageCrepe cakes have been the recent craze in my baking sprees and the crepe cake I am going to blog about is my blueberry cheese crepe cake.

The wonderful thing about making crepe cakes is that you only need a good 8-9inch non-stick pan.

recipe:

crepe recipe (makes approx 30 pieces of crepe):

A:

675g fresh milk

405g eggs without shells

3/4 tsp salt

195g plain flour

84g icing sugar

B:

90g butter (melted by double boiling)

method:

  1. stir ingredients A in a large bowl until u get a smooth batter. Strain through a sieve, rest 30 minutes. Add in ingredients B and mix in well just prior to frying the crepes.
  2. Heat non-stick frying pan over medium heat until pan is really hot with a slight smoke seen. Use a small ladle and pour a little batter into the pan so that just a thin layer of batter covers the base of the pan.
  3. cook crepe until underside has set.
  4. when edge turns pale golden, use a spatula to ease it away from the pan. Use your hand and carefully lift out the crepe. Remember to stir the batter every time you scoop as the batter thickens on standing.
  5. Repeat process.


Filling:

A: 250g cream cheese, 200g blueberry filling

B: 200g non-dairy fresh whipping cream


method:

place ingredients A into a large mixing bowl, beat until soft and creamy.

Ingredients B beat until thickened.


To assemble the cake:

lay the cake on a turntable. Place one piece of crepe on it. Spread ingredient B (filling) on the crepe.

Layer a piece of crepe over the filling and spread ingredient B (filling) on the crepe.

Later another crepe over the filling and spread with ingredient A (filling).

To be honest it does not really matter which filling  you want to spread first, you can spread ingredient A (filling) first on the crepe or ingredient B (filling), it’s totally up to you. Just keep repeating the process until the end and spread some blueberry jam over the top.

Keep the cake chilled overnight before slicing!

imageEnjoy!!

Twice cooked belly pork recipe

It has been ages since I last blogged, actually it has been almost a year!!!! *gasp*…. Blame the exams. I had been busy preparing for my GP specialist Part 1 exams which I have passed!!! woohooo!!! Hence, I am back blogging, for a while before things crack up again! Problem is I have another part 2 practical exam to sit for sometime next year 2016….*sniffles*…which means at some point, the blog will be ‘abandoned’ again until the exam torture ends!

I have loads of dishes which I have cooked and collected many amazing recipes over the last year, hopefully, I will get the chance to blog them all!

Anyway, christmas had just came and went! I felt tremendous urge to blog and share about this wonderful pork which I cooked for the Christmas dinner at my sister’s house! Totally moist and melt in the mouth! Skin was thin and crispy!

Of course once you learn how it is cooked and you know how sinful it is (slow cooked in fat!), this will successfully stop you from being overly greedy when it comes to eating it! I always thought confit is for duck, but heck, it taste brilliant with pork too!

Just had to blog about it cuz it taste toooo gooood!! Even better than the chinese siu yuk!

I would call it the british version of the chinese siu yuk.

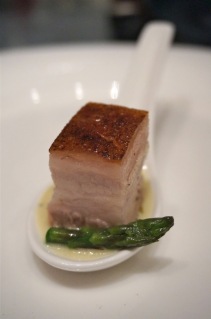
The pic below shows the final result of the recipe for the Twice cooked belly pork! It is sitting on onion apple veloute and you can find the veloute recipe in the link just below. My recipe below has been tweaked from the original Gordon ramsay recipe but results are still fantastic!

Original recipe from Gordon Ramsay: http://www.bbcgoodfood.com/recipes/9844/twicecooked-pork-belly-with-an-onion-and-apple-vel

\
Ingredients for belly pork:
Handful of thyme
Handful of rosemary
1 tbsp sea salt
few pinches of 5 spice powder
1 1/2 kg belly pork (no ribs, try to get the thinner half)
800g goose fat
Steps:
1) Season the pork on both sides with sea salt and 5 spice powder. Leave it overnight if you have time!
2) Scatter the herbs at the bottom of an ovenproof dish (I used a Le Cresset cast iron casserole to cook this).
3) Place the pork skin side up in an overproof dish on top of the herbs.
4) Heat the oven to 150 C/gas 2/ fan 130C.
5)Empty the goose fat into a saucepan and heat until liquid and starting to simmer.
6) Ladle the fat over the pork. Add sunflower oil to cover if you need to.
7) Cover the casserole with a foil.
8) Cook the pork in the oven, undisturbed, for 3 hours
9)Remove the dish from the oven, leave to settle for 10 minutes.
10) Line a tray with greaseproof paper.
11) Carefully lift the pork from the fat and take off any herbs.
12)Lay it on the paper, skin side down.
13) Cut another piece of paper and lay it over the pork.
14) Cover with a tray, weigh it down with a couple of cans and leave in the fridge overnight.
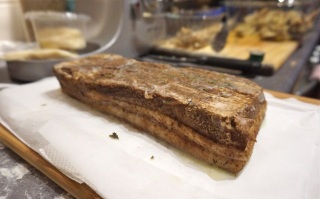
This is how it looked after being rested overnight.
15) The next day, when you are ready to cook the pork, heat a drizzle of oil in a large non-stick ovenproof pan (I use a Le creusset anodised non-stick frying pan which is ovenproof as well. Totally worth the investment! Cost £90 for one pan and that’s not including the lid!)
16) Lay the pork, skin side down, and leave for a few minutes to crackle, then place in the oven to cook for 20 minutes.
17) Remove from the oven and check to see that the skin has blistered, then carefully flip it over and cook the underside for 3 minutes just to heat through.
18) Lift out onto a board and cut with a SHARP cleaver. Serve on a chinese spoon or whichever way you prefer!
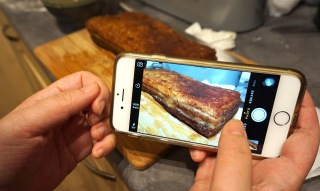
End product before slicing it up!


Chicken baked cheesy rice recipe by Stephanie

I call this a chicken baked cheesy rice.

Tasted it a few times when my sister made it but never did it myself. Decided today that I have to use up the pieces of chicken breast which I got from a bargain at Waitrose and the idea of a baked rice spring into my mind.

Simple but delicious! Mouthfuls of cheese is just so sinful! Definitely a dish I would make again and again!

Chicken baked cheesy rice recipe by myself:

Serves 4-6

Ingredients:

3 cups of cooked rice (cooked using a rice cooker)

5 pieces of chicken breast, sliced into smaller pieces (you can use chicken thighs if you want to)

200g of button mushrooms sliced thickly

Some minced garlic

Two sliced onions

1 and half cans of baxter cream of chicken (you can use campbell or whichever brand you prefer, I used baxter as there was a sales at waitrose!)

280ml of double cream

salt and black pepper to taste

Dried parsley

Approximately 400mg of mozzarella + cheddar shredded cheese

A relatively deep pyrex dish (mine is 35cm) for baking

Steps:

-Preheat oven at 200 celcius.

1) Heat up the pan with a knob of butter. Stir fry minced garlic and onions. Add in the chicken and fry until nearly cooked before adding in the mushrooms. Continue to stir fry until the mushrooms become soft and the chicken is just cooked.

2) Add cream into the pan and stir well. Add in the baxter cans cream of chicken and bring to a boil. (Always add in the cream before adding the chicken stock.)

3) Add the cooked rice into the sauce. Stir and let it cook for a few minutes until the rice has fully absorbed all the sauce.

4) Place the rice in a deep pyrex dish. Cover with all the yummylicious cheese and make sure it is well spread over the top of the rice.

5) Bake in a preheated oven at 200 celcius for 15 minutes or until the cheese is golden brown. Sprinkle with fresh or dried parsley at the end when the dish is done!

Rice pudding with apple compote and shortbread crumble recipe

I first made this 3 years ago for a christmas party and was impressed by the taste of it. I just love how the texture harmonises together i.e. the bite of the crumble within the rice pudding. Just taste so good that I had to make it again. This time round, I made it on my birthday which was 2 weeks back. It still tasted soooo amazing! Attempted making 3 course meal which my boyfriend said that this dish was the best among the others. Just had to concur with him.

Rice pudding with apple compote and shortbread crumble recipe by Stephen Terry in the Good Food Guide Recipes book. 

Makes 4-6 individual crumbles

Ingredients:

For the rice pudding:

250ml double cream

250ml milk

1 vanilla pod, split in half lengthways

85g pudding rice

55g caster sugar


For the apple compote:

2 large bramley apples, peeled, cored and cut into 5mm dice

50g caster sugar


For the shortbread crumble:

25g butter, softened

40g strong white flour

Generous 1/2 tbsp cornflour

pinch of baking powder

20g caster sugar

Pinch of Halen Mon sea salt


Steps:

1) For the rice pudding, put the cream, milk and vanilla pod into a saucepan and slowly bring to the boil. Then add the pudding rice, reduce the head and simmer for 12-15 minutes or until the rice is just cooked. Add the caster sugar and bring back up to the boil. Remove from the heat, leave to cool, and remove the vanilla pod.

2) To make the apple compote, put the apples and caster sugar into a pan and cook over a medium heat until the apples are cooked and tender, but still holding their shape, Remove from the heat and leave to cool.

3) For the crumble, preheat the oven to 140 celcius/Gas 1. Put all the ingredients in a bowl and rub together with your finger tips to the consistency of large breadcrumbs and then spread on a baking sheet. cook for about 35 minutes or until golden. Remove and leave to cool.

4) To serve, heat the rice pudding and apple separately. Put the rice pudding and the apple compote in large glasses in alternate layers and sprinkle generously with the shortbread crumble.

My version of a beef bourguignon recipe

After making so many versions of beef bourguignon, at the same time not entirely sure which is the true version, I have came up with the version that suits me the most! haha..

This is my version of a beef bourguignon which I found tasty enough for my liking, doesn’t matter whether it’s the true version or not,

Ingredients:

1.5kg best braising steak, aberdeen angus, sliced into decent chunks, seasoned with salt and pepper

250g bacon lardons

1 bottle of full-bodied red wine – burgundy or bordeaux

500g chestnut or button mushrooms, halved if mushrooms are big

500ml beef stock

2 tbsp tomato puree

1 bouquet garni

4 garlic cloves, crushed

1 whole onion, finely chopped

5 sprigs of fresh thyme

salt and black pepper for seasoning

3 tbsp of cornflour – mixed in water so they do not form clumps

15 small onions

Steps:

1) Preheat the oven at 170 deg celcius. Heat a large casserole pan, add in 2 tbsp of olive oil. Fry until golden brown, about 3-5 minutes. Fry until the meat is browned all over. Add in more olive oil if necessary. (some would like to use goose fat instead of olive oil but I go for a slightly healthier version). Do this in a few batches (at least 4-5 batches) so that you don’t overcrowd your pan. Set the meat aside when it is browned.

Note: Some people use plain flour to coat the beef prior to frying it which works as well but I find that this method tends to leave a burn coating on the inside of the casserole so I then avoided using this method. If you use plain flour to coat the beef, you can omit the cornflour from the ingredients list.

2) After all the beef have been set aside, in the same casserole pan, add in the bacon lardons in 2 batches and fry until golden brown. This would render all the fat from the bacon into the pan. Set aside the bacon lardons once it is golden brown.

3) Using the bacon oil in the same pan, fry the onions. Add the fresh thyme, bouquet garni, mushrooms and garlic into the pan and fry until lightly browned. Mix in the tomato puree and cook for a few minutes. Then return the beef and bacon lardons and drained juices into the pan and stir through.

Note: Some people prefer frying the mushrooms in the middle of the process of step 6 and add it into the casserole so it’s entirely up to you!

4) Pour the bottle of wine and beef stock into the casserole and let it boil. In the meantime, put the small onions into another pot of boiling water and let boil for 5 minutes. After the onions are boiled, drain the water away. When the onion is cooled enough, chop the root off the onion and peel the skin off the onion leaving it whole. Add the peeled onions into the casserole.

5) Season it with some salt and pepper bearing in mind that the stock (beef stock and red wine) will reduce so don’t add too much. You can season at the end if you like to, rather than doing it now.

6) Put the casserole lid on once the casserole is boiling and put the casserole into the oven. Leave it in the oven for 2-3 hours to cook. Towards the end of 2-3 hours, add the cornflour into the casserole to thicken the mixture. If the mixture is not thickened enough to your liking, then add more cornflour.

7) Garnish with some chopped parsley. 

Enjoy!!!